|
NetWare configuration for Windows environments
|
|
This is a quick configuration procedure using the Xerox PhaserShare Administrator. For information on installing the PhaserShare Administrator, see
PhaserShare Administrator Software for NetWare Networks. For detailed information on the PhaserShare Administrator, functions, see the PhaserShare Administrator on-line help.
Printing the Configuration Page
Your printer's Configuration Page reports information that you need for NetWare configuration. For information on printing a Configuration Page, see
The printer's Configuration Page.
NOTE
On the printer's Configuration Page, all zeros in one or more of the
IPX Networks
fields indicates that the printer does not recognize the network connection; this probably indicates a faulty cable connection, an incorrect frame type, or
Reply to Get Nearest Server
has not been set to
on. It must be set to
on
for at least one file server or router on the same segment as the printer.
Using the
PhaserShare Administrator Quick Configuration Wizard
Log on to the file server
NetWare 3.x.
Log on to the default NetWare file server as SUPERVISOR or SUPERVISOR equivalent. Many of the operations performed using the PhaserShare Administrator require SUPERVISOR privileges (for example, creating queues).
NetWare 4.x.
In Bindery mode, log on to the default NetWare file server as SUPERVISOR, SUPERVISOR equivalent, or ADMIN /B. Many of the operations performed using the PhaserShare Administrator require SUPERVISOR privileges (for example, creating queues).
NetWare 4.x, NDS (NetWare Directory Services) mode.
Log on to the default NetWare file server as ADMIN or ADMIN equivalent. Many of the operations performed using the PhaserShare Administrator require ADMIN privileges (for example, creating queues).
NOTE
While not required, it is recommended that you log in only to the file servers to be configured with this printer.
Start the PhaserShare Administrator
To start the PhaserShare Administrator, double-click the PhaserShare Administrator icon. Refer to your Windows documentation for complete information on how to start applications. For information on installing the PhaserShare Administrator, see
Installation.
When you start the PhaserShare Administrator, the
Main
window is displayed.
Select a print server
In the
Main
window
Printer List, click the print server name/printer name.
NOTE
If the printer does not show up in the list of available printers, there could be a network hardware problem, an incorrect frame type, or incorrect search options settings (see
Printer does not appear in the Main window printer list
).
Launch the Quick Configuration Wizard
Click
Quick Configuration
to launch the Quick Configuration Wizard.
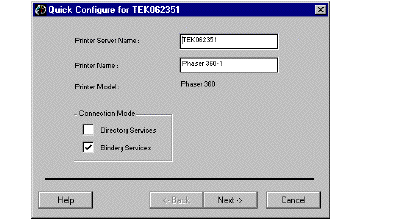
Configure the printer and set up queues
-
If desired, change the
Print Server Name
or
Printer Name.
-
Select connection mode(s) by checking the box(es) for
Bindery Services,
NDS Services, or both (the Phaser 740, 780, and 360 printers support both).
-
Click
Next. The dialogs that follow allow you to configure Bindery connections, NDS connections, or both. Supply the following information for these connections:
|
Information needed for Bindery connections
Select either the configuration file server or the preferred file server from the drop-down list; click
Next.
If the file server you want is not on the list, proceed with these steps:
|
-
Click
File Servers
to display the
File Servers Browse
dialog box.
-
Select the server you want. Click
OK. You are returned to the
File Server Selection
dialog box.
-
Select either the configuration file server or the preferred file server from the drop-down list. Click
Next.
|
Create and select a new queue, or select an existing queue; click
Finish.
|
Information needed for NDS connections
-
Specify the current
Directory Services Tree; (the tree where the print server will reside).
-
Specify the current
Directory Services Context. (the location in the directory services tree where the print server will reside).
-
Create and select a new queue, or select an existing queue; click
Finish.
Verify information and finish the configuration
After you have entered the configuration information, the Quick Configuration Wizard displays the
Configured Printer Information
dialog box, which reports the information you have entered.
-
Verify that the information is correct.
-
If the information is correct, click
Apply Changes.
-
If the information is not correct, click
Back
to return to previous dialog boxes and correct the information. Click
Next
to return to the
Configured Printer Information
dialog box. Click
Apply Changes.
-
To exit the wizard and return to the
Main
window without making any changes, click
Cancel.
-
After you click
Apply Changes, the printer resets; the changes take effect when the reset is complete.
Return to Topic List
|
| |
|