|
Cleaning for upper media tray jams: media-pick roller
|
|
Approximate time to complete: 5 minutes
If you are experiencing media-feeding problems, including mispicks and multiple picks of media from the standard (upper) media tray, you can generally correct the problem by cleaning the media-pick roller with isopropyl alcohol.
The printer's front panel messages guide you through the necessary steps to perform automatic cleaning procedures. You will need the pick roller cleaning tray included in the cleaning kit when you run the Clean: Media Tray Jams routine from the printer's front panel. You can also clean the media-pick roller using an alcohol-soaked cloth; refer to Manually cleaning the upper pick roller.
Note: Media-picking problems can also occur when the maintenance
tray is not properly latched. You may need to remove and re-latch
the maintenance tray to cure a media picking problem.
Automatically cleaning the upper pick roller
- When the printer is on and the Ready message or the printer's name appears in the front panel, press the Clean button. The printer displays the first selection in the menu:
Clean:Light Stripes
- <---- Clean Test
- Press the left arrow(<---) button until the following front panel message appears:
Clean:Media Tray Jams
- <---- Clean Test
- Press the Clean button once again.
- When the following front panel message appears, press Print if you want a printout of the procedure, otherwise, press Continue:
Print Instructions?
- Continue Print
- When you press Continue, a front panel message prompts you to install the cleaning tray in the media tray.
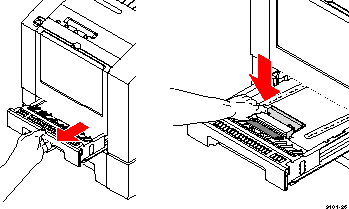
- Remove the upper media tray from the printer. Remove all
print media from the media tray.
- Remove the cleaning tray from the cleaning kit and open the
tray lid to reveal the cleaning tray sponge.
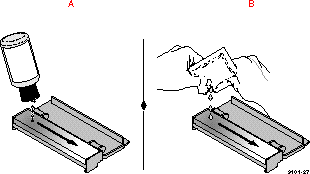
- Wet the cleaning tray sponge with isopropyl alcohol (A); a
bottle is provided in the cleaning kit for dispensing the
alcohol. Alternately, you can squeeze the alcohol from two
pre-soaked alcohol wipe packets to moisten the cleaning tray
sponge (B).
Caution: Do not use rubbing alcohol because it can contain water and
oils that leave undesirable residue on the printer parts. Never
use water to clean the printer's internal components. Failure
to follow these instructions may invalidate your printer's
warranty.
- Place the cleaning tray in the media tray so that the tray's
sponge pad is nearest the paper tray's handle. Press the two
tabs underneath the cleaning tray into the two square notches
provided in the media tray.
- Insert the media tray with the cleaning tray into the printer.
- Press the Clean button. The printer cleans the media-pick roller while displaying the following message:
Cleaning
- When the cleaning operation is complete, the following front panel message appears:
Remove Cleaning Tray
- Remove the media tray from the printer.
- Remove the cleaning tray from the media tray.
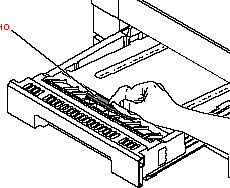
- Examine the separator pad located inside the media tray near the paper tray's handle. If it is coated with dust, wipe the separator pad using a clean cloth or a dry brush.
- Reload media in the media tray. Replace the media tray in the printer.
- The front panel re-displays the following message:
Clean:Media Tray Jams
- <---- Clean Test
- Press the Exit button to return to normal operation. Store the cleaning tray in its original packaging for later use.
- If media-feed problems persist, you may need to manually clean the media-pick roller by hand with an alcohol-soaked cloth.
Manually cleaning the upper pick roller
- Remove the upper media tray from the printer.
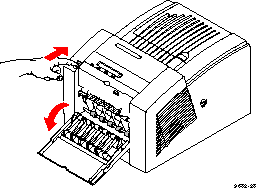
- Open the front cover.
Caution: Hot surfaces exist behind the upper paper-feed rollers. To
avoid personal injury during cleaning procedures, do not
reach in behind the paper-feed rollers.
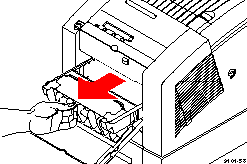
- Grasp the maintenance tray by the front edge and lift up while sliding it out of the printer. Keep the maintenance tray upright.
Note: Once the maintenance tray has been partially used, it leaks drum
fluid if tipped. Contact with the drum fluid poses no known
health risk.
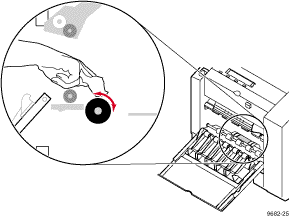
- Locate the top of the media-pick roller behind the black rubber transport rollers. To clean the top surface of the media-pick roller, use either the pre-packaged alcohol-soaked cloth or a lint-free cloth folded into a two-inch square and soaked with alcohol.
- Scrub the top surface of the media-pick roller thoroughly. If the cloth becomes dirty, discard it and use another.
- Replace the maintenance tray in the printer.
Note: To prevent media jams at the media tray, be sure to push the maintenance tray into the printer until both sides latch in place.
- Close the front cover.
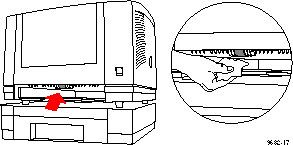
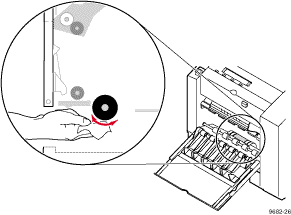
- Locate the bottom of the media-pick roller according to the following illustration.
- Using an alcohol-soaked cloth, scrub the bottom of the media-pick roller thoroughly.
- Replace the upper media tray in the printer.
|
| |
|