Skip to main contentClick to view our Accessibility Statement or contact us with accessibility-related questions.

Phaser 540


Replacing the transfer kit
Replace the transfer kit (consisting of the transfer roller and the waste bin) when the front panel reads Transfer Kit: replace. Refer to "Troubleshooting and print quality quick reference" for more information on diagnosing print quality symptoms.

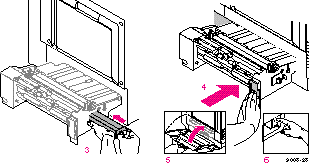
Remove the used transfer roller

  1. Turn the power off.

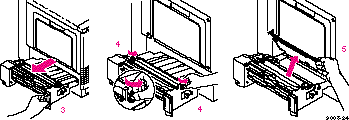
  2. Open the left side door. (If you have an optional Lower Tray Assembly, open the upper of the two left side doors).

  3. Use the blue handle to pull out the paper feeder.

  4. Turn the blue screws counterclockwise about four turns to unlock the cover.

  5. Lift the cover until it catches and stays open.

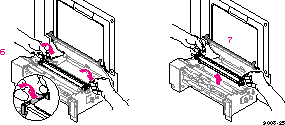
  6. Hold the transfer roller by its blue handles; rotate the handles toward the printer.

  7. Lift out the used transfer roller and dispose of it as normal office waste.

Insert the new transfer roller

  1. Holding the new transfer roller by its blue handles, place the roller into the paper feeder.

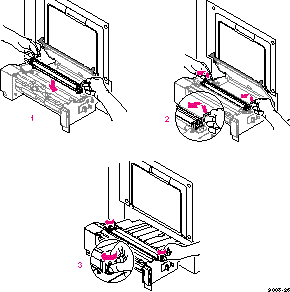
  2. Rotate the handles away from the printer to seat the roller securely.

  3. Close the cover and tighten the two blue screws (clockwise).

Replace the waste bin

  1. With the paper feeder still out, pinch the waste bin's handle; press the safety catch to release it and remove the waste bin.

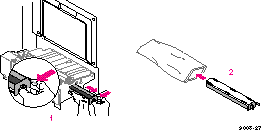
  2. Place the used waste bin in the plastic bag provided in the kit; close the plastic bag securely and dispose of it as normal office waste.

  3. Insert the new waste bin.

  4. Slide the paper feeder back into the printer.

  5. Close the left side door.

  6. Turn the power on.

Reset the copy count

To reset the copy count for the transfer kit, complete these steps.

  1. Press the Menu button to enter the front panel menu. You will see this message in the display:

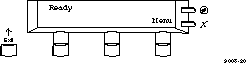
    Help Pages
    <--- ---> Menu

  2. Press the right arrow button (--->) until the display reads

    System Counts
    <--- ---> Menu

  3. Press the Menu button to enter the System Counts menu.

  4. Press the right arrow button (--->) until the display reads

    Transfer kit
    <--- ---> Menu

  5. Press the Menu button; then press the Reset button.

  6. Press the Exit button until the display reads Ready.


Support Home Page
Phaser 540 Support Page

Network Printers Support Home
Additional Information

Register your Printer
ASPs & TPMs
About Software Support
Color Connection
Printer Warranties
Material Safety Data Sheets
Supplies & Cartridge Recycling Program