|
Duplex printing
|
|
There are two ways that you can make a duplex print:
Automatic duplex
-
Requires the Automatic Duplex/Lower Tray Assembly
(Xerox order number ZDPLX)
-
Laser paper only: 75 - 90 g/m2 (20 - 24 lb.)
-
Automatically prints double-sided with a single driver selection or front-panel selection. No user interaction required.
Manual duplex
-
Multi-Purpose Tray
Laser paper, Xerox glossy paper, and card stock.
-
Paper tray
Laser paper only: 60 - 90 g/m2 (16 - 24 lb.).
Automatic duplex
CAUTION
Never install media in the Duplex Unit. It is meant to be empty to automatically reverse media for double-sided printing. When the printer detects media in the Duplex Unit, it reports
Jam at Duplex Unit.
-
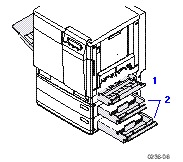
Make sure that the Duplex Unit is inserted in the printer's upper slot.
-
Load 75 - 90 g/m2 (20 - 24 lb.) laser paper in the Paper tray and insert the tray into the printer's middle or lower slot.
-
Decide on a binding preference (how the page turns) for Step
4
:
-
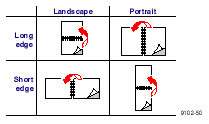
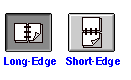
Long-Edge
The page turns on the long side,
regardless of orientation.
-
Short-Edge
The page turns on the short side,
regardless of orientation.
-
In the application's
Print
screen, select the Duplex option
and
a binding preference.
|
Macintosh: LaserWriter 8.5.1
-
From the pull-down menu, choose
Layout.
-
Check
Print on Both Sides.
-
Select the icon for your binding preference:
Macintosh: LaserWriter 8.3.4
-
Click the
Options
button.
-
Select
2-Sided Printing.
-
Select
Long-Edge Binding
or
Short-Edge Binding.
PC: Windows 3.1x
-
Click the
Setup
button.
-
Click the
Features
tab.
-
Select
2-sided printing
.
-
Select
Long-Edge Binding
or
Short-Edge Binding.
PC: Windows 95 / Windows 98
-
Click the
Properties
button.
-
Click the
Paper
tab.
-
Click
More Options
button and select
Printing on Both Sides.
-
Select
Flip on Long-Edge
or
Flip on Short-Edge.
PC: Windows NT4
-
Click the
Properties
button.
-
Click the
Advanced
tab.
-
Under
Paper/Output, select
Print on Both Sides.
-
Select
Short Side
or
Long Side.
|
Manual duplex
CAUTION
Use only laser bond paper for duplexing in the paper trays; use laser paper, glossy paper, or card stock for duplexing in the Multi-Purpose Tray. Two-sided printing on specialty media can shorten component life. For opacity and feed reliability, use laser paper that is 90 g/m2 (24 lb. bond). For best results, do not use heavy toner coverage on Side 1 of a manual duplex print; also, increase the top margin on Side 1.
Multi-Purpose Tray
(recommended)
-
Laser (bond) paper: 90 - 150 g/m2 (24 - 40 lb.)
-
Xerox glossy paper
-
Card stock: up to 163 g/m2 (40 lb.)
-
Cover stock: up to 163 g/m2 (60 lb. cover)
Paper trays
-
Laser paper only: 60 - 90 g/m2 (16 - 24 lb.)
-
If you do not have the Automatic Duplex/Lower Tray Assembly
Using the
Multi-Purpose Tray
Side 1
NOTE
For a multi-page document, print odd-numbered pages for Side 1. (This selection is application-specific.)
-
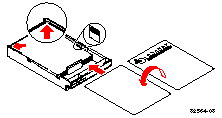
Place the paper in the Multi-Purpose Tray:
-
The side to be printed is
face-up.
-
The top of the page enters the printer first.
-
Select the media type at the printer's front panel prompt.
|
Media type
|
Front panel selection
|
|
Standard paper or letterhead
90 - 105 g/m2 (24 - 28 lb.)
|
Paper
|
|
Xerox glossy coated paper
|
Coated paper
|
|
Card stock
|
Card or envelope
|
|
Heavy paper or letterhead
109 - 150 g/m2 (29 - 40 lb.)
|
-
In the application's
Print
screen under
Tray Selection
or
Paper Source, depending on the driver, select the
Multi-Purpose Tray
and send the job to the printer.
-
Remove the printed paper from the output tray.
Side 2
NOTE
For a multi-page document, print even-numbered pages for Side 2. (This selection is application-specific.)
-
Place the paper in the Multi-Purpose Tray:
-
The blank side is
face-up
(the side that has already been printed is now
face-down
).
-
The top of the page enters the printer
first.
-
Select the media type at the printer's front panel prompt:
|
Media type
|
Front panel selection
|
|
Paper or Letterhead
90 - 105 g/m2 (24 - 28 lb.)
|
Paper 2nd side
|
|
Xerox glossy coated paper
|
Coated paper
|
|
Card stock
|
Card or envelope
|
|
Paper or Letterhead
109 - 150 g/m2 (29 - 40 lb.)
|
-
In the application's
Print
screen under
Tray Selection
or
Paper Source, depending on the driver, select the
Multi-Purpose Tray
and send the job to the printer.
-
Remove the printed paper from the output tray.
Using a paper tray
Side 1
NOTE
For a multi-page document, print odd-numbered pages for Side 1. (This selection is application-specific.)
-
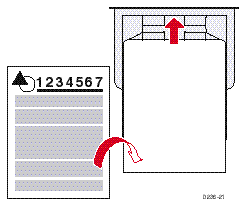
Place the paper in the paper tray:
-
The side to be printed is
face-down.
-
The top of the page is under the paper tray's hooks. This example shows letterhead paper.
-
Insert the paper tray into the printer.
-
Use either the front panel or the application's
Print
screen with a supported driver to make these selections:
-
Select the tray by location:
Upper,
Middle, or
Lower
-
Select output order:
Face Down
-
Send the job to the printer.
-
Remove the printed paper from the output tray.
Side 2
NOTE
For a multi-page document, print odd-numbered pages for Side 1. (This selection is application-specific.)
-
Place the paper in the paper tray:
-
The side to be printed is
face-down
(the side that has already been printed is now
face-up
).
-
The top of the page is under the paper tray's hooks.
-
Insert the paper tray into the printer.
-
Use either the front panel or the application's
Print
screen with a supported driver to make these selections:
-
Select the tray by location:
Upper,
Middle, or
Lower
-
Select output order:
Face Up
-
Send the job to the printer.
Return to Topic List
|
| |
|